



WHEN SAILING, ESPECIALLY IN ROUGH SEAS, sailboats are subjected to various forces that can affect their structural integrity. Waves, wind and the constant impacts of the hull against the water generate compression, torsion and bending stresses on the boat. These stresses, accumulated over time, can cause damage that, at first glance, could go unnoticed.
This guide will help you identify signs of wear and structural damage on the hull of a used sailboat. The objective is to learn how to carry out a detailed inspection, starting with an external dry inspection of the hull to an assessment of the keel, rudder, propeller and other fundamental elements. In any case, keep in mind that this is a first aid guide before considering the purchase; for a complete analysis, it is always advisable to have the opinion of an expert.
Initial Hull Inspection: General Assessment
We may have wondered why some boats have loose or damaged gunwales. We may have answered that the skipper must have hit the dock. The explanation is logical, although the real answer usually goes in another direction. The most common thing is that the tensions mentioned at the beginning, transmitted to the junction of the hull with the deck and possibly added to a poor design or construction, have caused the gunwales to break off after a time acting silently.
We could give other examples of defects that have their origin in even greater damage, such as loose bulkheads or that leak in a porthole that we never managed to seal.
All this serves to remind us that during the examination of a hull we will have to be very attentive to any detail that reveals damage or structural weakness. And to do so we will need to see the boat out of the water, an obligatory step with any sailboat that we seriously think about acquiring. We will now do exactly that: imagine that we are analysing a boat that is in dry dock. Let’s see how things look below the waterline.
What to look for?

Alignment and Symmetry: First, stand in front of the patient. Use an object to draw a line of sight from the top of the mast to the bottom of the keel. We want to see two things: whether the keel is aligned with the hull and whether the hull is symmetrical.
Smooth Surfaces: Next, walk around the boat with your face against the hull to look for bumps, scrapes, cracks or irregularities in the surface or sheen, which could indicate repairs or areas subjected to stress.
Critical Areas: There are areas that are more prone to cracks or structural damage due to stresses during navigation. Look especially closely at:
- Corners of the transom.
- Areas around the outboard motor mounts.
- Areas just below the chines (where the bottom of the hull flexes relative to the sides).
Practical advice: a question of light and perspective
The following three photos are a good example of the need to take time to carry out the inspection. They belong to the same sailboat and were taken four hours apart. In the first, taken from the bow, we can see an apparently smooth hull; in the second, taken from the stern, the irregularities are obvious: we are talking about some major repair work; the last, with a slightly different point of view than the previous one, already reveals the hydrolytic bubbles.
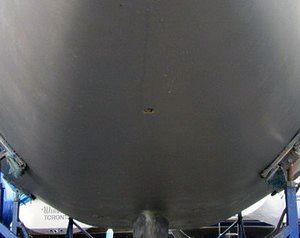
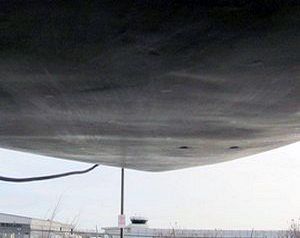
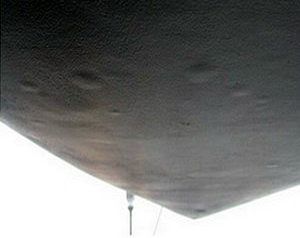
▌A hull in seemingly good condition can look very different depending on the angle and light under which it is observed.
Therefore, it is best to examine the hull from different points of view and under different lighting conditions. If we feel like it and have the opportunity, we can even carry out a night inspection. During this, with the help of a flashlight we will look for shadows that reveal irregularities on the surface.
In this guide we have organised the information by area, but the fact is that on a boat the systems and structural elements are closely interrelated. This means that you have to go back and forth constantly to compare on the inside something you have seen on the outside, which in turn has to do with the propeller, the chain plates or something else. Don’t be lazy about the hull: what on the outside seems like a minor defect can turn out to be a real problem on the inside.
The Keel: Possible Signs of Impact

▌Possible consequences of a ship hitting the seabed.
Next stop, the keel. Here, maintenance or repair work on the leading edge, or a wider joint at the forward end of the hull-keel joint, will indicate that the boat hit the bottom. So, when was that, just a few months before it was put up for sale or has it been sailing for a long time and without problems since it happened? Let’s see, papers: Is there an invoice for that work?
A repaired fiber hull may contain areas that are apparently in good condition but structurally weakened
These types of impacts are quite common in boats that sail in shallow waters. Depending on the quality of the construction and the force of the impact, they may not be important or may be an indication of more serious damage to other parts of the structure. It is important not to forget that a fibreglass hull that has undergone repairs may contain areas that appear to be in good condition but are structurally weakened. Our expert should be able to clarify any doubts regarding this aspect.
The Helm: Alignment and Structure

▌Left: A pristine exterior can hide a real mess. Watch out for any brown stains coming from the inside of the blade. Right: Structure of a rudder
Let’s leave the keel’s travails behind and look at the sad life of the rudder. We already know that it has to be aligned with the rest of the boat.
A typical rudder is made up of two outer pieces of fiber mounted on a metal frame and a PVC foam core. All of them must be perfectly attached to each other. If this joint fails, the blade can bend excessively and give way to cracks and delamination.
How to inspect it?
- Alignment and attachment: Make sure the rudder is aligned with the boat. Check the attachment of the metal components and the integrity of the stock (the shaft that connects the rudder to the hull).
- Integrity test: Give the rudder a good shake from side to side to check for excessive play in the hinges or stock, which could indicate wear in the bearings. We’ll also make sure it turns smoothly and is not damaged as a result of a collision.
The rudder after the boat has been hoisted
If a few hours after the boat has been installed in the dry dock, the rudder is still leaking water, this means that the water has penetrated the blade. This is one of the reasons why it is recommended to always be present during the hoisting of the boat. If the sailboat we are examining has been stranded for some time, we will water the rudder and wait for the outside to dry to check if the inside is leaking.
The propeller and the flying buttress: alignment and wear

▌The propeller could be damaged during hoisting if any straps are placed under the shaft.
Steps in the inspection
- Alignment: Check that both the propeller and the outrigger (the vertical piece that holds the shaft, which can be seen in the photo) are properly aligned. Any deviation could be a sign that the shaft is off-center or bent.
- Inspecting the blades: Look for dings or scrapes. These can be diagnosed by sight, but it is not as easy to determine if they are bent. Looking at them from the side makes it a little easier, although it is best to opt for measurements: using a fixed point on the hull as a reference, we will measure the distance between that point and the outer edge of each of the blades. If the results vary substantially, we may be looking at a damaged propeller or a bent shaft.
- Condition of the outrigger: Examine the wear on the outrigger rubber. If there is uneven wear, it could be a symptom of a poorly aligned or off-center shaft.
An interesting video
From 4:30 to 6.
Sacrificial Anodes

▌Few things are more suspicious than taking a boat out of the water and discovering that the anodes are shining like new | Photography: Rémi Kaupp.
Sacrificial anodes are parts that corrode easily and are usually made of zinc. Their function is to protect the metal elements of a boat (propeller, shaft, through-hulls, etc.) from an electrochemical process known as galvanic corrosion.
Without going into details of what the phenomenon consists of, we will only say that the anodes are there to corrode instead of the parts they protect, hence their name. When we examine a boat that has just come out of the water, we will have to make sure that the anodes are worn. If not, it would mean that they were not installed properly and did not perform their function. In this case, we can be sure that the boat has been corroding.
69% of sinkings in the US involve moored ships
Thru-hulls: A Critical Inspection Point

▌ISO 9093 standards recommend changing valves and thru-hulls every five years..
According to a BoatUS study published in 2014, 69% of sinkings in the US occurred while the boats were moored. The cause? Wear, fracture or corrosion of one of the elements that pass through the hulls of boats below the waterline.
It doesn’t seem like much more needs to be said to convince us of its importance, does it? We cover this aspect in more detail in the seventh entry of this guide.
In the meantime, we will have to locate the location of all the through-hulls. We need to know where to look for them when we get inside the boat without forgetting any.
Osmosis or hydrolysis: the hidden enemy
What is known as osmosis, referring to one of the most common diseases of fibreglass hulls, is actually a hydrolysis process. In short, what happens with it is that water penetrates the hull through the gelcoat, reacts chemically and generates corrosive substances that attack the laminate, break it down, create cavities and end up giving rise to the famous blisters.

▌How did the boat spend the winters? What is its history? In principle, a boat that spends 4 or 5 months a year in dry dock will be much less vulnerable to hydrolysis..
In most cases, hydrolytic spots are a manageable problem, but this is not always the case. They can appear anywhere on a fiberglass hull below the waterline, usually just under the gelcoat, and also inside the bilge. If there are only a few small blisters, the problem may not be more than cosmetic, but because they are so minor, they can be difficult to detect as they are hidden under several layers of antifouling paint. If there are many, the core of the laminate could be compromised and we are talking about structural damage that would require expensive repair.
A good place to check for signs of hydrolysis is the area of the hull just around the trailer supports or the pads on the cradles. In theory, but not always, blisters first become visible in the areas of the hull that are most in contact with moisture. These pads are usually covered with fabrics that absorb water every time it rains, which is why we might start looking for them there.
To learn more, read What does a sailboat sound like? The percussion test.
The legend? of pre-1972 fibreglass boats
We may have heard that fibreglass boats from before 1972 do not suffer from hydrolysis problems, something we cannot corroborate because we do not have direct knowledge. In any case, this is the explanation usually given by those who claim this: older fibreglass sailboats have thicker hulls because they were made based on designs intended for construction with wood. In addition, until 1972 the resin formula was different and more resistant to hydrolysis. With the arrival of the oil crisis this changed. The good old days came to an end and the resin formula changed to save costs. Both factors would mean that, except for physical damage due to impacts, the hull of a boat from that era would remain in good condition.
This longevity, however, would not be extensible to the deck and the cabin. This is because decks are often thinner and subject to more traffic and sun exposure than the hull, which can cause them to deteriorate more easily. Additionally, some older boat decks use a wooden core that can absorb water and rot over time, affecting their structural integrity.
Summary of key points
- Alignment and symmetry: Check that the keel is aligned with the hull and that the hull maintains its symmetry.
- Smooth surfaces: Inspect the hull for visible dings, scrapes, cracks or repairs.
- Critical areas: Especially check the corners of the transom, engine mounts and areas under the chines.
- Keel: Check for possible impacts on the leading edge and hull-keel joint.
- Rudder: Ensure alignment, structural integrity and no play in the stock or hinges.
- Propeller and outrigger: Check for alignment, damage to blades and wear on outrigger.
- Sacrificial anodes: Confirm they are worn to ensure they have protected against corrosion.
- Osmosis: Look for signs of hydrolysis or blistering on the hull surface, especially in areas of contact with moisture.
Too much text? Listen to the podcast:
GALLERY OF HORRORS

▌Loose sailboat gunwale cover. In such cases, be careful: the problem may not be with its fastenings, but with the structural integrity of the hull..

▌In these images we can clearly see how convenient it is to check anything that smells like burning: what on the inside (left) is a full-blown crack, on the outside is nothing more than a faint black line (and we have retouched the photo to highlight it).

▌This propeller is not from a sailboat, but it will do. The image shows a hull that is heavily hammered by the propeller, which hits against it every time it accelerates. It is unlikely that a loose propeller could cause this kind of damage on its own, so we will have to look inside (image below)..

▌As you can see, a bolt was missing from one of the engine mounts, causing the engine to move and the propeller to hit the hull..

▌Here the clean area of the propeller shaft indicates that the engine is moving back and forth on its supports. Also, the greater space between the shaft and the stern tube at the top (see where the blue arrows point) indicates a possible misalignment. In any case, let us not forget that a certain degree of deviation can occur when the boat is in the dry dock.

▌Dezincification can be diagnosed by the pink tone that the piece acquires: with the loss of zinc, copper becomes dominant (it is not usually as evident as in this photo).

▌Bent rudder. Note that its end is about to touch the hull. This type of rudder without support from the bottom is susceptible to giving way in extreme cases (See image below).

▌Same rudder as in the previous image, once opened. As you can see, the stock had bent, causing the laminate to fracture.

▌Gelcoat in poor condition. In the case of a repaired and repainted surface, even if the colour used is identical, the different layers of paint or gelcoat will degrade at different rates due to the effect of UV rays, and this is something that can be distinguished: over time, the gelcoat tends to turn yellow and have a marbled appearance, while its surface becomes porous and even floury after washing..

▌This hull has been painted and the bubbles are not due to hydrolysis, but rather the result of humidity, which affects the adhesion of the paint. In any case, it is a relatively expensive repair job if we want a professional finish..
INSPECTING A SECOND-HAND SAILBOAT: A COMPLETE GUIDE