



LIFE ON BOARD, especially when sailing long distances, can be more about dealing with problems with the boat than the actual sailing itself, adding stress and fatigue to an already demanding activity. And since things tend to break down when you push them hardest, those problems can surface at the worst possible times.
On the other hand, for most people buying a boat is a major expense, perhaps one of the biggest investments of our lives, and finding out that you need to replace the engine or undergo a major repair right after you buy it is a hard lesson to swallow.
It is infinitely better to make the mistake of discarding a good boat than to make the mistake of acquiring one in poor condition.
So, when checking a marine engine, the ideal would be to go to a mechanic for advice. But as we already know, before deciding on a sailboat we will visit several, and it would be ruinous to hire someone to advise us all those times; consequently, it is better for us to learn some things that will allow us to discard those more dubious engines. Once this first filter is done, we can call a mechanic for when we are serious about buying a boat.
Whether or not we have that mechanic, when buying a used boat we should not make a decision without being quite clear about what is happening with the engine, and if we have any reason to doubt its condition, it is better to pass it by. It is infinitely better to make a mistake by discarding a good boat than by buying one in poor condition.
General appearance of the engine
The appearance of an engine offers valuable clues about its general condition. This does not mean that a shiny, apparently new engine cannot hide problems, but if we find one that looks unkempt (for example, dirty and cracked belts, or more or less botched repairs) it is easy to assume that its owner has not maintained it properly. On the other hand, if the engine looks good and we see that spare parts are stored on the boat, or we see old parts that have already been replaced, we can, with logical prudence, give the owner a vote of confidence.
What spare parts should we find, you ask? On a boat it is advisable to carry:
- An oil filter
- A fuel filter
- A water pump impeller
- A replacement belt
- Engine oil
- Cooling fluid
- Transmission fluid
Head gasket and sealing

▌Oil mixed with water (car engine).
We’ll start with a visual examination of the cylinder head gasket. If we see dripping spots and traces of silicone, rubber or anything else, it’s best to forget about it; that would mean that the engine is not properly sealed or has suffered a serious breakdown and has had to be opened.
Next, we’ll open the oil cap located on the top. Here, what we want to find is obviously oil, whether it is lighter or darker. If what we see is what we see in the photo above, something milky or pasty like mayonnaise, it means that water is mixing with the oil due to a problem with the cylinder head gasket or a crack in the engine block. This is reason enough to rule out the boat.
And since we’ve opened the cap, we’ll also take the opportunity to look through the hole (in some engines there is a plate under the cap that serves to distribute the oil, which unfortunately will prevent us from inspecting). We want to check if what we can see from there (probably the camshaft) is well oiled and looking good, or if the parts have scratches, grooves, marks or any kind of wear. The latter cases, although they may seem minor, would mean that the engine is poorly oiled or has been poorly maintained, and the best thing, again, is to cross that boat off our list.
Checking Marine Engine Oil
Oil is one of the best indicators of engine health. Make sure to check the oil with the engine stopped and cold:
- Remove the dipstick and wipe it clean. Reinsert it all the way and remove it again.
- The oil level should be between the two marks on the dipstick. A slightly low level may be acceptable, but an excessively high level is cause for concern, as it could indicate mixing with other fluids, such as water, antifreeze or transmission fluid.
- Examine the appearance of the oil. If it has bubbles, a milky texture or metallic particles, this is an indication of serious problems, such as excessive engine wear or water entering the system.
- Next, we will run our fingers through the liquid and observe it well lit. An abrasive texture or the presence of metallic particles indicates excessive engine wear, which in addition to contaminating the oil seriously affects its lubricating capacity. We will smell it: does it look burnt? Bad sign.
- If we press our index finger and thumb wet with oil, separate them a little and see that the oil does not break, it means that it retains its properties. If, on the other hand, it breaks like water and has no elasticity at all, it is in bad condition. In any case, it is not unusual for boat owners to change the oil when it is time to sell it, which can be suspicious if the general appearance of the boat is one of neglect.
Taking an oil sample to a lab for analysis can give you more information about the condition of your engine, but generally this type of testing is more useful for long-term preventative maintenance than for a one-time check. You can compare this test to a blood test: it may not predict a heart attack, but it can warn of “high cholesterol” that could lead to a future problem.

▌From 1 to 5, oil in good condition; 6 and 7, it needs to be changed. Concoction #8 is oil mixed with water..
Belt, hoses, clamps and electrical cables
- Belt: We need to check that it still has elasticity and is not stiff. We will press it moderately to see if it is cracked or too loose: it should not give more than a centimeter or the equivalent of its own thickness.
- Hoses: Do they look soft, cracked or chafed? We will squeeze them with our fingers to see if they are cracked, which would translate into certain leaks. When pressing them we should feel that there is something circulating through them.
- Clamps: Are they worn, rusted, loose or so tight that they cause the hoses to bulge or even cut them?
- Electrical cables: They should not be cracked or hardened, and the batteries should have clean terminals, perfectly fixed and without signs of corrosion (we will look for a greenish stain on the terminals, especially on the positive).
Marine engine water pump
The water pump is key to preventing engine overheating. Open it and inspect the condition of the impeller blades. Deformation or wear will indicate that too much time has passed between changes, which can lead to engine overheating. The presence of impurities would indicate the existence of rubber particles circulating in the system.
The following video shows what a water pump is and how to change its impeller (use subtitles if needed).
Fuel leaks
We will check the fuel supply lines, pumps and injectors. We will use a flashlight to look for the reflection of possible leaks along the circuit, which are often invisible. We will follow the lines until we reach the filters and check for signs of corrosion. From there we will continue to the tank.
Exhaust elbow
Corrosion and carbon deposits from the exhaust gases can accumulate here, and are mixed with water to be cooled. The paint colour should be the same as that of the rest of the engine, and if it varies, this means that there is poor cooling.
Let’s ask about the “hidden” zinc in the engine

▌Zinc anode from a Volvo engine.
Does the owner change the zinc anodes on the engine?
The ones that are placed on the shaft are easy to see, but the zinc pencil that goes inside the heat exchanger is often overlooked; in fact, many an owner doesn’t even know it exists. It has to be changed once a year to avoid problems with corrosion.
Engine compartment and mount
The space in which the engine is installed can also provide some clues:
- Compartment: Is it clean or are there splashes, salt water, oil or antifreeze stains?
- Bed frame: Are there cracks, excess water or water mixed with lubricant?
- Silent blocks: Are they cracked, deformed or misaligned?
- Shaft alignment: We will check the connection of the shaft plate to the motor and the condition of the bolts in this connection, which must be perfectly tight. If the shaft is not well aligned it will vibrate, especially when reducing the speed or reversing.
- Condition of the stern tube and possible leaks in the stuffing box.
With the engine running
If we decide to test the boat at sea, let’s make sure it is well loaded, because if there are problems, they will surface more quickly. In a previous post about the most unspeakable sales tricks of some sellers, we warned about a piece of advice we read on the Internet that caught our attention:
«Try it out at sea: start the engine and let it warm up an hour before the client arrives. A dead battery or a hard start will scare him away. Unload the boat completely, including the bimini and awning, and set out with only the safety equipment, batteries, water and fuel. Try to convince the buyer to take as few people with him as possible; this will make the boat appear more agile, faster and more lively, and will prevent the true tightness of the boat and the limitations of the engine from becoming painfully apparent.»
So, having been warned by the latter, let us look at the following:
- Starting: Watch how long it takes to start. A hard start could indicate problems with the batteries, electrical system, or even a faulty fuel pump.
- Idling and response: An engine should idle smoothly. If it behaves roughly or stalls when accelerating, there could be compression problems or clogged fuel filters. It’s also worth knowing that engines with an idle speed of more than 800 rpm may have been intentionally set to run at a higher idle speed to mask problems. Detecting these kinds of things is what makes it advisable to seek advice from a mechanic
- Smoke: Read the smoke signals your engine is sending you. A well-maintained engine may smoke when starting or idling, but not when it’s already warmed up and running. The color of the smoke can also give you clues about possible problems: black if combustion is incomplete, white if it’s expelling water vapor, and blue, which is the worst case, if it’s burning oil.
- Transmission Fluid: Shortly after starting the engine, we can take a sample of the transmission fluid and put it on a piece of paper. We’ll inspect it under a bright light or in sunlight for metallic particles, which are a sign of significant transmission system wear. Sticking a long, thin magnet (the kind mechanics use to retrieve bolts) through the dipstick opening and sweeping the bottom of the case can also yield interesting results.
We’ll also check for:
- Fluctuating RPMs.
- Fluctuating oil pressure – Low oil pressure can be caused by anything from faulty oil pumps to failed camshaft bearings.
- Increased water temperature – High water temperatures can be caused by something as simple as a bad pump, but they can also be a sign of more serious problems.
Ask about the maintenance history
Finally, the owner should have a detailed maintenance record of the engine, which records the hours of use and the work performed. If the seller keeps invoices for repairs and oil changes, this is a good sign. Don’t hesitate to ask to see these documents before making a decision.
Regarding the hours of use, keep in mind that the hour meter on an engine may not mean anything, as an unscrupulous seller could easily change it.
And where is the manual? All engine manufacturers publish a manual. It is important to have it on hand because it gives the answer to questions such as what type of filter should be placed in the oil circuit, what is its capacity, how much tension the alternator belt can be put on, or how often this or that maintenance task should be performed. Working on an engine without knowing the answer to these types of questions sooner or later leads to breakdowns or malfunctions. If the boat owner does not have the manual, what has he relied on every time he has been tinkering with it?
Summary of key points
- Importance of inspection: Buying a sailboat is a big investment, and a poorly maintained engine can result in unexpected expenses and problems at sea. It is crucial to perform a thorough inspection before purchase.
- General appearance: A clean, well-maintained engine suggests good general maintenance. Look for onboard spare parts such as oil and fuel filters, water pump impeller, spare belt, engine oil, coolant and transmission fluid.
- Head gasket: Leaks, drips or traces of sealants indicate problems that require attention.
- Engine oil: Oil reveals a lot about the health of the engine. Check the level, color, texture and smell. The presence of water, metal particles or a burning smell are warning signs.
- Belts, hoses and wires: Inspect their condition, looking for cracks, wear or corrosion.
- Water pump: Check the impeller for wear or damage.
- Fuel Leaks: Carefully inspect fuel lines, pump, and injectors for leaks.
- Exhaust elbow: Color should be uniform; variations suggest cooling problems.
- Zinc anodes: Ask if the owner replaces them regularly, including the internal anode in the heat exchanger.
- Engine compartment: Look for cleanliness, good bearing condition, and shaft alignment.
- Test run: If possible, test the engine at sea. Observe starting, idling, throttle response, exhaust smoke, and water temperature.
- Maintenance history: Ask for maintenance records, including hours of use and repairs performed.
- Owner’s manual: Make sure the engine manual is available.
Too much text? Listen to the podcast:
GALLERY OF HORRORS

▌Aspect of a car engine in which oil and water have mixed.

▌Hull heavily hammered by the propeller, which hits against it every time it accelerates. A loose propeller is unlikely to cause this kind of damage on its own, so we will have to look inside (next image).

▌As you can see, a bolt was missing from one of the engine mounts, causing the engine to move and the propeller to hit the hull.
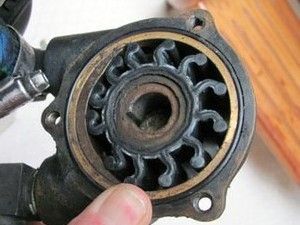
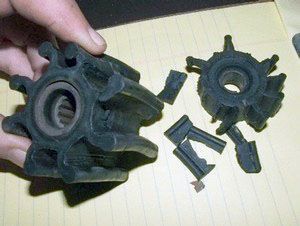

▌Three pictures above: If we follow the water intake from the through-hull to the engine we will find the water pump. Inside it there is an impeller. In the first picture we see that its blades are bent, which is normal. The problem comes when these break (second picture) and their fragments enter the system. In the third picture we see the external appearance of a water pump. At the time of taking the photo it was 6 years old and did not have a single mark on the screws. The original paint was intact. It had never been opened! The impeller should be removed at the end of the season so that the blades can return to their original position. It all depends on the use we give to our boat, but we should not go more than 3 years without changing the impeller, even if it looks fine.
INSPECTING A SECOND-HAND SAILBOAT: A COMPLETE GUIDE