


WHEN A MAST FALLS, the usual suspects are the mast itself, the stays and the shrouds. But in practice, the culprits are usually other pieces of the standing rigging: the spikes, the turnbuckles, the chain plates and smaller but no less important elements such as the screws, bolts, terminals and pins that hold it all together. With so many pieces and connections, the inspection of the standing rigging will be a meticulous task for which we will need a small tool kit that will consist, take note, of:
- A camera to document everything.
- A scouring pad to clean dirty surfaces.
- A magnifying glass and our nails to detect cracks.
- A small mirror to examine hard-to-reach areas.
- Some toilet paper to check the integrity of the cables.
- Binoculars to inspect the highest parts from the deck.
- A bosun’s chair (the chair used to climb the mast) and enough humor to sit on it and visit the heights.
Corrosion: the constant threat
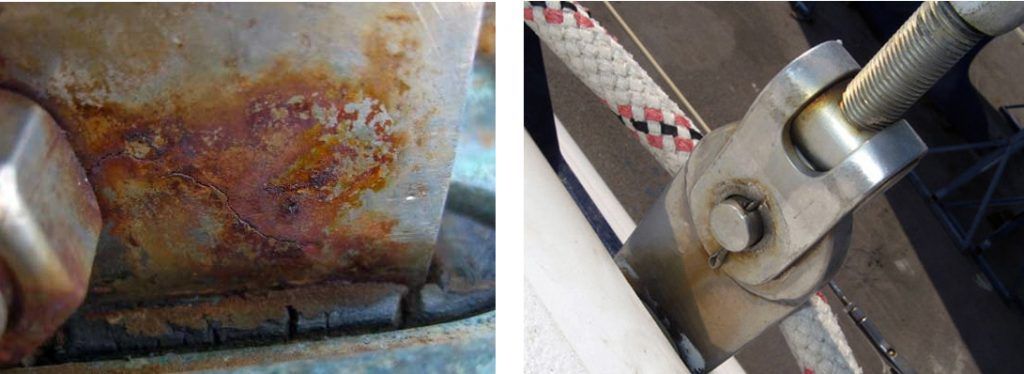
▌Compare both images: anything beyond a light rust stain can be a sign of corrosion. We will use the scouring pad to clean the surface and we will use the magnifying glass and our nails to look for cracks.
On most sailboats, the standing rigging is made of stainless steel, a material well suited for this purpose but with corrosion as its Achilles’ heel. We could write a long article about corrosion, and not just in relation to steel. It is certainly one of the topics we least want to get into of all those we will have to familiarise ourselves with as future owners of a sailboat, but if you want to delve deeper, you can take a look at Why does stainless steel rust? and The effects of seawater on engines.
In order not to exhaust anyone with more details than this entry already includes, for now we will limit ourselves to pointing out that in the marine environment stainless steel is always under the threat of corrosion, whether it be so-called crevice corrosion or pitting. Whenever we see signs of any of these ailments (we have included photographs in the “Gallery of Horrors” at the end of this text) we should be on our guard: fatigue fracture of the smallest element, such as a simple cotter pin, can result in dismasting, something as dangerous for our physical integrity as it is painful for our pocketbook and self-esteem. Thus, in the inspection of the standing rigging we will start from the basis that rust, deformations and cracks are serious problems and the elements that suffer from them will have to be replaced. Having said that, let’s take a look at the boat.
Inspecting the stays and shrouds
Just like we did with the hull, we’ll start the inspection of the rigging by looking at its general appearance. We want to make sure that the whole assembly has uniform angles and lines. So, what can we say about its geometry? Do we see any kind of imbalance or lack of symmetry when looking at it from the front? This would be a good time to take photos. Next, we’ll take a walk around the deck and manually check the tension of the stays and shrouds, which should be more or less the same on all of them. If these adjustments are not uniform, the tighter cables will have been pulling the mast to its side and, in the worst case, will have warped it. The truth is that to make sure that its condition is correct, the ideal would be to have a tension meter, but without one these tests can tell us if there is any significant difference in tension.

▌Union of a shroud with the deck.
At deck level, the turnbuckles and chainplates must be aligned with the stays and shrouds. If not, there must be a toogle (pictured, the piece that connects the turnbuckle to the chainplate) to facilitate the movement of the cable in all directions. However, even if this piece is present, we should not assume that things are in order: depending on how the rigging was installed, the rigging may still be subject to tensions that will weaken it (see photo below right) and eventually break some of its components. In case of misalignment and tension, the surrounding gelcoat may show damage that should alert us.
The next step is to examine the cables one by one for corrosion and broken wires. To do this, we will wrap them in a bit of toilet paper and rub them up and down, taking care not to get any loose wires stuck in us. If the paper tears, it means that the cable is near the end of its useful life and needs to be replaced. Remember that cables rarely break in the middle. Their weak point is the connection to the terminals, where we should pay special attention.
The chain plates and their installation
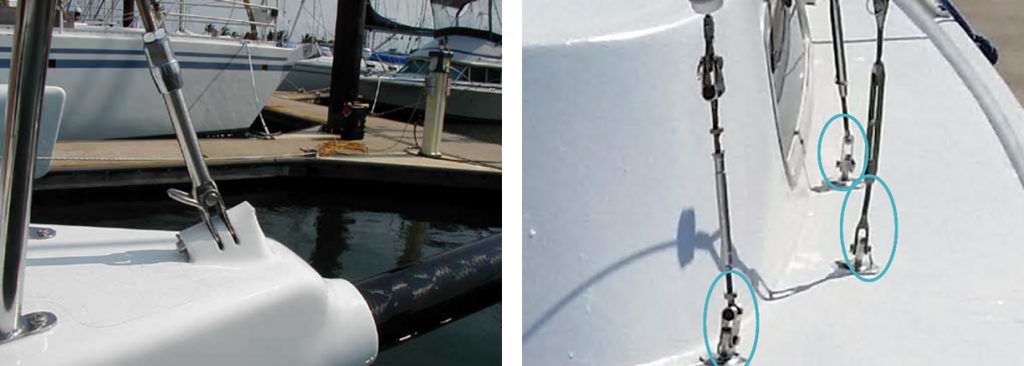
▌Left: Forestay aligned. Right: Note how the toogles and chainplates are oriented in different directions than the shrouds. Over time, the toogles will bend and weaken and the chainplate seal can crack, allowing leaks to occur. The center turnbuckle, without a toogle, is already bent.
Chain plates, which are subject to enormous stresses during navigation, can be the source of leaks and delamination problems, something we have already seen in the previous entry of this guide. In anticipation of something like this happening to us, we will inspect the seal where it joins the deck, where there should be no cracks or signs of excessive wear. We will also clean them with the scouring pad to expose any cracks and signs of corrosion that dirt could hide.
As we have pointed out above, a rust stain is not alarming, but rust can be reason enough to disassemble a chain plate and see what is hidden behind it, which could be in much worse condition. If the chain plates pass through the deck and are bolted to a bulkhead or frame, we will inspect these elements for signs of repairs or signs of weakness, such as discoloration or tears. And while we’re at it, we’ll do the percussion test to detect problems of delamination or rot.
Probably the best place to attach a chain plate, although it may not be the prettiest, is on the hull. Those that are simply bolted to the deck and not secured to a structural member are the least desirable installation.
Turnbuckles and their types
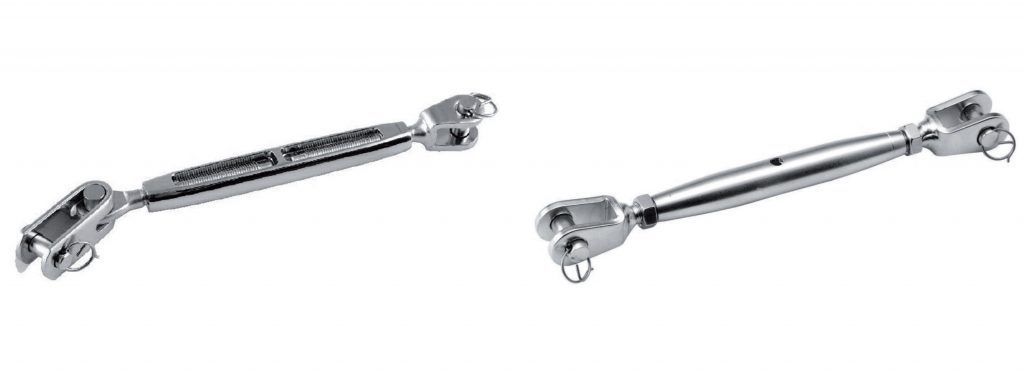
▌The turnbuckles should never be tightened to the maximum. It is necessary to leave some room so that the mast can be fully erected. If upon inspection we see that we cannot tighten them any further, it is because they are already at their limit or due to poor lubrication.
Turnbuckles are responsible for adjusting the tension on the cables in the rigging. There are two main types: open-body turnbuckles and closed-body turnbuckles. Which type do we get? Open-body turnbuckles are easier to inspect and do not retain moisture, while closed-body turnbuckles retain moisture, which encourages corrosion, and are prone to freezing, but they also retain lubricant better.
A couple more questions:
- What kind of lubricant did the previous owner use? Teflon is better than oil or grease because it doesn’t hold dirt, which wears out the threads. In any case, oil or grease is certainly better than nothing.
- Are there pins securing the threads? During sailing, these can become loose and even come loose due to stress and vibration. The absence of pins can be a sign of neglect or lack of knowledge, something that will undoubtedly affect the preservation of other parts of the sailboat.
Terminals: critical points in the rigging
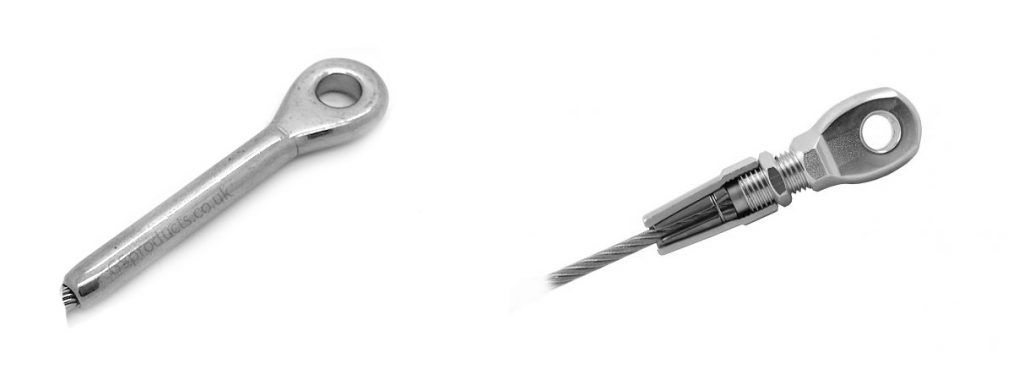
▌Left: Crimped terminal. Right: Detachable terminals are more expensive and less common than crimped terminals, but are highly valued for their durability. These terminals have the advantage of being reusable and can be installed or repaired with a minimum of manual skill, some basic tools, and careful follow-up of instructions, which is a great advantage when an emergency repair needs to be done offshore.
Most sailboats will have cables with crimped terminals, a system that has a long history of problems, especially in warmer climates, so it is easy to find negative opinions. These elements are made by compressing the terminal around the cable, a process that must be done perfectly to ensure the connection. If it has had to be pressed several times (a bad practice) there is a greater chance that the connection will be weak and could break. The following video shows how this operation is done:
Cracks in crimped terminals are the most common rigging failure and also the most visible: before they appear, you can see a line of rust, an indication that the cable inside is also rusting. If you don’t see any signs but want to be sure, you can use a magnifying glass and your fingernails to look for these cracks, which are usually very small at first.
Terminals, especially those attached to the deck (not so much those at the end attached to the mast), tend to have problems with rusting at their union with the cable. This is where water from the stays and shrouds goes, and where the cables begin to break from the combination of stress and corrosion. Rust, if found, is a red flag: the cable will most likely need to be replaced.
Some skippers use gel or wax to seal terminals, and while this may be effective for a while, it won’t be a long-lasting solution and could very well backfire by trapping water and encouraging corrosion.
The mast and boom: structural integrity
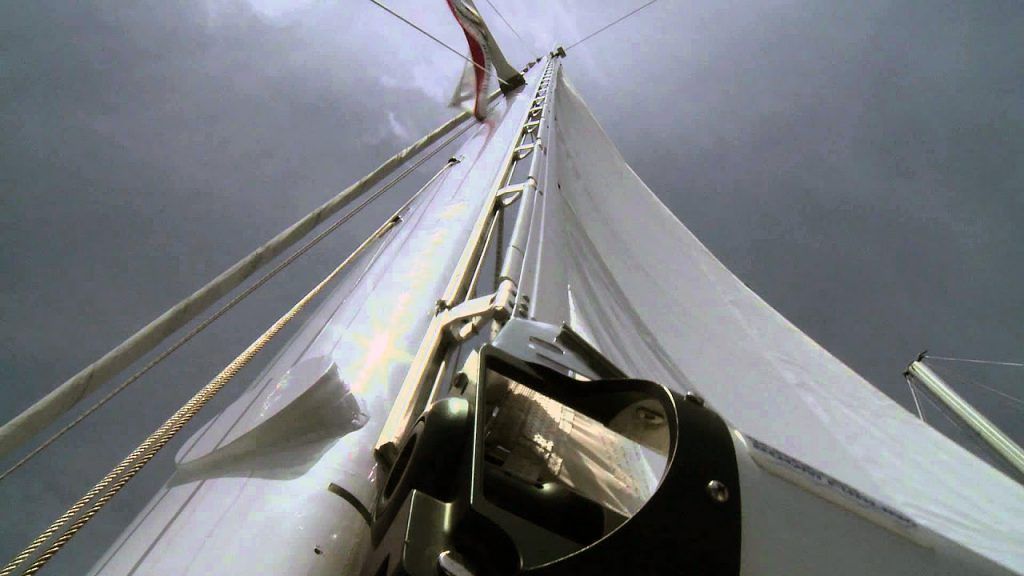
▌In a conventional sailboat the mast is usually made of aluminum..
As for the mast, the first thing to do is to stand in front of the track where the mainsail runs and look up to see if it is completely straight or has some degree of curvature. If it is and it is not possible to correct its deviation by trimming the rig, we are looking at serious damage.
Also check the condition of the track. Here we are interested in seeing its wear, if it is damaged in its fastenings and if it is in poor condition due to the action of the cars, in the case that it has a car system, or the skates (which is the most common method) that are used to hoist the sails. From here, the inspection will be carried out in a similar way to how we have done with the rest of the metal elements: we will look for cracks, signs of corrosion, rust, deformations, etc. We will carefully examine the mast-boom joint, the accessories that may be installed and all the elements subject to wear.
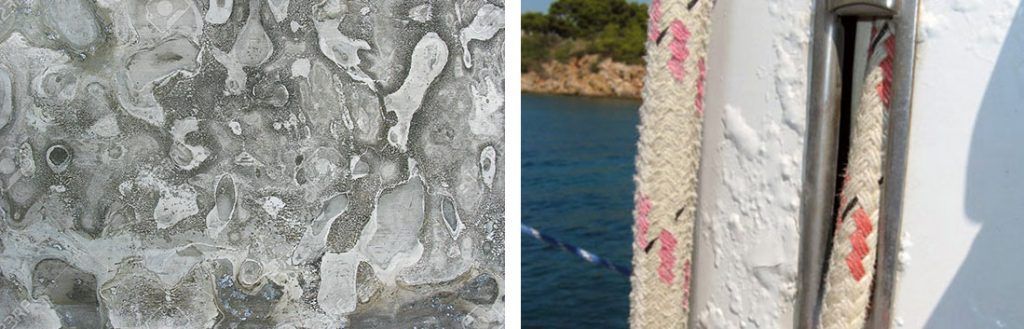
▌Unpainted aluminum masts, the best option: Once moisture penetrates a painted mast, the absence of oxygen opens the door to corrosion.
On an unpainted aluminum mast, the warning signs are pitting and a white, sticky substance or white powder that is oxidized aluminum (above, left image). Some dust is normal, but if we find high concentrations and/or pitting, especially when these are deep, we are facing a serious problem that threatens the integrity of the mast.
On the other hand, on a painted mast, areas with raised paint, especially if they are close to an accessory, are indicating the existence of corrosion and should be inspected in detail. Galvanic corrosion occurs when stainless steel or bronze accessories are mounted in direct contact with aluminum masts. To minimize the risk, a layer of zinc chromate, polysulfide or Teflon is applied, or an insulating sheet of nylon or tufnol. Silicone is also useful for this purpose, but if we find it, we should not forget that it can make removing the accessories difficult later.

▌Winches must turn easily and stop when changing direction.
Finally, we will check if the mast or boom have dents, we will verify the proper functioning of the moving parts (sheaves, locking jaws, winches, etc.) and we will find out if any of the accessories mounted on the mast came like this from the factory or were installed later. In this second case, is it a professional job? You cannot drill a mast just like that. In the case of the booms, we should not find accessories mounted on their sides, since inside there is limited space for trolleys and pulleys and the fixings could hinder their movement.
Inspection of welds and rivets
Aluminium welds are high stress points, and particular attention should be paid to the points under the greatest stress. The following should be considered:
- Aluminium welds crack from the ends inwards, so when examining them, the ends should be the most important.
- Improperly made welds can have sharp edges and cracks, which can lead to corrosion. Any welds that are cracked or have serious rust problems should be repaired as soon as possible.
- Any loose or missing rivets should be punched out and replaced with a rivet of the next larger size. If we find rivets of different sizes, it is worthwhile to inform us of what happened, also bearing in mind that if one or two of the ones holding the pin were loose or in poor condition, it would have been best to replace all of them, not just the damaged ones.
The base of the mast: a key point

▌The base, whether it rests on the deck or the keel, must be made of the same material as the mast.
A mast can be keel-supported or deck-mounted, and each configuration presents specific problems that we need to inspect for.
If the mast is keel-supported, it is more vulnerable to corrosion due to water buildup in the bilge. If the mast is deck-mounted, however, problems are often related to a lack of adequate structural support. While this is sometimes due to a design error, more commonly there is a failure of the below-deck support elements, such as bulkheads, struts, or brackets, which may have shifted, rotted, or delaminated.
For both cases, we’ll start by examining the area below the base of the mast for warping. On a deck-mounted mast, we’ll also check the woodwork near the base. We’ll look for doors that don’t close properly, that rub or have worn edges from rubbing, as well as loose panels or cracks in the wood. A sagging or bowed roof can be a clear sign that the mast is not properly supported.
In addition, regardless of the configuration, the base of the mast can also be affected if the mast is tilted and the compression load is not evenly distributed. This manifests itself in cracks or deformations in the base, or in bulges that can be felt by touch, indicating excess compression in a localized area.
If after this inspection everything seems in good condition, it will be time to climb the mast to continue the inspection.
Surveying the Heights
Most people have a natural aversion to hanging from a rope at the top of a swinging pole, and that’s no surprise: it’s an experience that can be impressing. The binoculars we added to our tool kit were there to save us the experience, but if we’re serious about getting a boat and do decide to go up ourselves, make sure there’s someone experienced down there to pull us up, and that we’ve secured everything we’re carrying with us. We don’t want to break anything, and especially not hurt anyone.
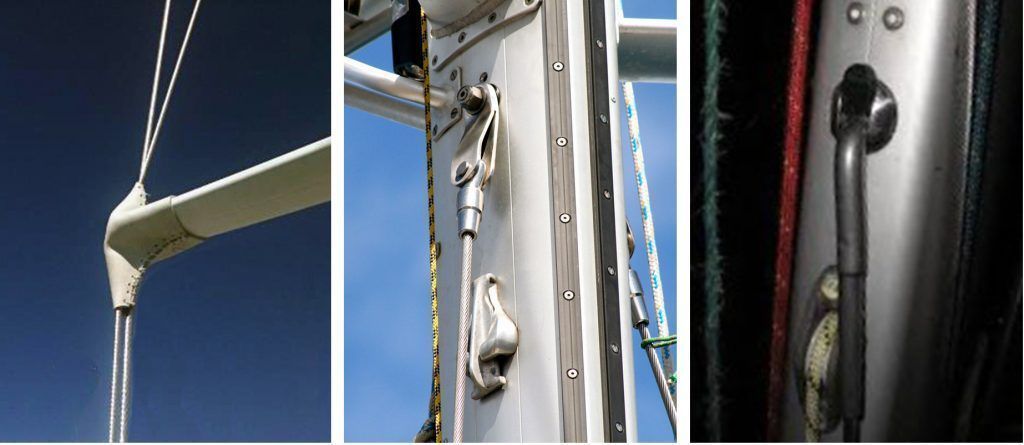
▌Spreader covered by a cover, shroud with removable terminal and shroud with pressed and T terminal.
Instead of going straight up to the top and then working our way down, we’ll make a first stop at the spreaders; that way, if we see cracks or something we don’t like, we can make the decision to leave it there.
We’ll start by trying to move the spreaders to check that they’re perfectly fixed and we’ll make sure that they form the same angle with the shrouds: bent spreaders have been responsible for more than one dismasting. Next, we’ll examine their ends. Many skippers cover them with tape or protective covers to prevent damage to the sails, which has the side effect of possibly accumulating saltpeter and humidity with its well-known corrosive effects.
As with the chain plates, the forks, used to fix the cables to the mast, must be aligned with stays and shrouds. We’ll check that they’re perfectly fixed and intact: any cracks will require that this part be replaced.
As for the shrouds, they should be wrapped with tape to prevent the halyards or sails from getting caught, which could easily tear. If they are not, remember to check the condition of the sails in that area.
If the shrouds use T-shaped terminals, we will look for cracks and signs of discoloration in the inner area of the curve, which will reveal the existence of tension and elongation of that element. A part in this condition will have to be replaced.
The last stop is the top of the mast, where we will use the mirror to inspect elements that would otherwise be inaccessible, such as the supports and connections of the various accessories installed there: wind sensors (weather vanes, anemometers), radio antennas, etc. Does the masthead light work? No? Is it a problem with the bulb or the installation? Of course, we will also check the halyard accessories, especially the pulleys, which wear out over time and can end up breaking due to tension. We will make sure that they rotate freely without being loose or swinging.
On the way down, we will take a look at the rivets and/or screws used to secure the mast rail and any other elements that we may find, such as rungs.
Summary of key points
- Close inspection: Use a camera, magnifying glass, toilet paper, binoculars and a boatswain’s chair to inspect the rigging and mast.
- Corrosion: Crevice and pitting corrosion is a constant threat to stainless steel; replace any affected parts.
- Turnbuckles and chain plates: Make sure they are aligned and free of corrosion. Rub cables with toilet paper to detect breaks.
- Crimped terminals: These are critical points; look for cracks or rust, especially on terminals close to the deck.
- Mast and boom: Inspect for deformations, dents, welds and rivets. Check the mast-boom joint and the proper functioning of moving parts.
- Inspection at height: Climb the mast to check spreaders, yokes, pins and fittings at the top of the mast.
Too much text? Listen to the podcast:
GALLERY OF HORRORS

▌Cracked terminals. The image reminds us of the need to carry binoculars with us to check the heights of the mast.

▌This vinyl shroud cover has only served to trap moisture and dirt and create an oxygen-free enclosed space that has given way to corrosion.


▌Corrosion on chain plates. Note the elongation of the holes and how incorrect alignment with respect to the shroud has caused the crack in the example below.

▌A case of pitting corrosion. On the right, what could happen with strong winds.

▌Corrosion occurs in places where the steel lacks oxygen but is in contact with water, such as at this junction of the mast and the boom.


▌Cracked mast.

INSPECTING A SECOND-HAND SAILBOAT: A COMPLETE GUIDE
- The Hull
- The Deck
- The Standing Rigging and The Mast
- The Sails
- The Interior
- Plumbing and Electrical System
- The Engine
- The Marine Surveyor